3 - Shelter And Clothing
This chapter covers how to dress appropriately for the environment and build shelters to protect yourself from the elements.
Be prepared
Gear
Necessities:
- Emergency space blanket
- Poncho
- Change of clothing
- Extra socks
- Boots or sturdy shoes
- Sunglasses
- Cordage (paracord)
- Sewing kit (needle and thread)
- In colder climates:
- Insulating layers (jacket, pants, hat, gloves)
- Waterproof outer layer
- Waterproof/insulated boots
- Thermal underlayers
- Hand warmers
- For overnight stays:
- Sleeping bag
- Sleeping pad
- Tent
- Tarp
Optional:
- Additional changes of clothing
- Hat or bandana
- Pillow
- Gloves
- Bug net
- Gaiters
- Hammock
- Duct tape
Knowledge and skills
Start by learning how to do the following:
- Choose clothing appropriate for your environment.
- Use an emergency space blanket.
- Get warm quickly.
- Layer clothing for warmth.
- Set up a tent and sleeping bag.
- Identify environmental hazards when selecting a shelter location.
- Tie several types of knots.
Once you have mastered these skills, you should learn how to do the following:
- Construct a natural shelter.
- Repair clothing.
Clothing
Your first line of defense in any environment is your clothing. Proper attire should keep you dry, regulate your body temperature, protect you from the sun, and prevent insect bites.
Materials
When choosing clothing, consider the following materials:
- Wool: Retains warmth even when wet.
- Polyester/nylon: Quick drying and moisture-wicking.
- Down: Lightweight and insulating but loses warmth when wet.
- Cotton: Retains moisture and loses warmth when wet. Do not wear cotton in cold or wet environments.
Layers
You should plan to wear multiple layers of clothing to protect against the elements. Layering allows you to adjust your clothing to changing conditions and maintain body temperature.
In cold environments, remove or add layers to prevent sweating while staying warm.
In warm environments, you may only need to wear a base layer. But you should always pack rain gear, such as an emergency poncho, in case of sudden weather changes.
If you need extra insulation in a pinch, stuff your clothing with dry leaves, grass, or other insulating materials.
- Base layer: Wicks moisture away from the skin. This layer should be tight-fitting.
- Undergarments
- Socks
- Pants
- Shirt
- Middle layer: Insulates and retains heat. This layer should be loose-fitting.
- Sweater
- Fleece jacket
- Insulated pants
- Vest
- Outer layer: Protects against wind, rain, and snow. This layer should be loose-fitting.
- Rain gear
- Windbreaker
- Accessories: Protect against sun, wind, cold, and insects.
- Hat
- Sunglasses
- Gloves
- Scarf or bandana
Footwear
Be sure to choose footwear that is appropriate for your environment. In cold climates, wear insulated, waterproof boots. In hot climates, wear breathable, lightweight shoes. Always break in new footwear before a trip to avoid blisters.
If you plan to be hiking in wet conditions, consider wearing waterproof boots.
Bring extra socks, preferably made from wool, and ensure they are taller than your boots to avoid blisters.
Shelters
Choosing a shelter location
When selecting a site for your shelter, consider the following:
- Proximity to building materials.
- Proximity to water and food sources.
- Protection from the elements.
- Free of dead trees and branches that could fall.
- Free of threat from avalanches, rock slides, or flooding.
- Free of insects, poisonous plants, or dangerous animals.
- Suitable for signaling for help if needed.
- Avoid staying above the treeline in mountainous regions, as you will be exposed to the elements.
Gathering materials
Prefer wood and debris that are already on the ground and require minimal effort to use. Avoid logs that are too thick to break by hand.
Shelter types
You can construct various shelters using tarps, ponchos, or natural elements. Here are some common types:
Lean-to
A simple shelter made by leaning a large sheet of material against a support like a tree or a ridgepole. It protects from wind and rain.
- Lash a ridgepole to two trees or supports. If you are using a tarp or poncho, this can be a cord.
- Lay a tarp or poncho over the ridgepole, allowing one side to touch the ground. If using natural materials, lay branches and leaves over the ridgepole.
- Secure the sides with stakes or rocks.
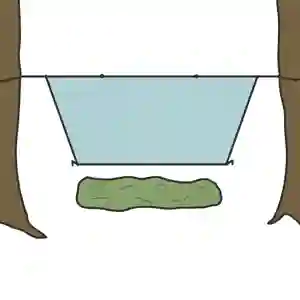
If you're constructing a ridgeline with cordage, form a bowline at one end, wrap the cordage around a tree, and pass the free end through the bowline's loop. Secure the other end to a second tree using either a taut-line hitch or a trucker's hitch, then tighten it. To attach a tarp, pull a small section of the ridgeline through the grommets and insert a stick through the resulting loop to hold it in place.
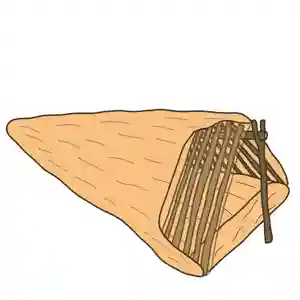
A-frame
A more enclosed shelter that provides better protection from the elements.
- Lash two sticks together into an A-shape. You can also use a fork in a tree or stick, a stump, or a large rock as a support.
- Place one end of the ridgepole on top of the A-frame (or fork/stump/rock) and the other end on the ground.
- Lay a tarp or poncho over the ridgepole, securing the sides with stakes or rocks. If using natural materials, lay branches over the ridgepole angled slightly upward, then add leaves or other debris from the bottom up.
Caves
Natural shelters that offer protection from the elements. Use caution when entering caves; they can be home to animals or have poor ventilation. Avoid lighting a fire if possible since smoke can accumulate.
Emergency space blankets
Wrap yourself in an emergency space blanket to reflect body heat and protect against the elements. You can also use it to create a shelter by tying it between two trees or supports. Be gentle when handling the blanket, as it can tear easily.
Tents
If you have a tent, set it up according to the manufacturer's instructions. Ensure the tent is staked securely and the rainfly is in place. Most tents can be set up by inserting poles into sleeves or clips and securing the tent to the ground with stakes.
Hammocks
If you have a hammock, set it up between two trees or supports. Ensure the hammock is secure and the rainfly is in place. Be sure the trees or supports are strong enough to hold your weight.
Insulation
You can place insulating materials like leaves, straw, or clothing between you and the shelter walls to retain body heat. This barrier prevents heat loss and keeps you warm. If you have a sleeping bag or extra clothing, use them.
Use materials like leaves, straw, or clothing to insulate yourself from the ground. These materials create a barrier between you and the cold ground, preventing heat loss. If you have a sleeping pad, place it under your sleeping bag for additional insulation.
Tips
- Use materials like leaves, straw, or clothing to insulate the ground and walls of your shelter.
- Keep the shelter compact to retain heat but large enough to lie comfortably.
- Position the shelter to protect against prevailing winds and to maximize the warming effects of the sun.
- Fill gaps in the shelter with leaves, grass, mud, or other insulating materials.
- Ensure adequate airflow to manage condensation and smoke.
Repair
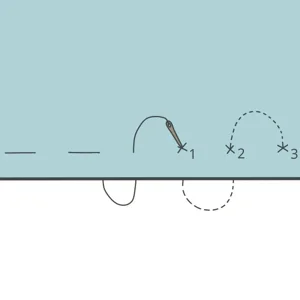
Sewing
Back stitch
Used for seams that require strength, such as on backpacks or tents.

Running stitch
Used for quick repairs on clothing or gear in places where strength is not critical.
Whip stitch
Used to repair tears or holes in fabric. It can also be used to connect two pieces of fabric.

Tarps
If your tarp's grommet breaks, you can still attach it to a rope by creating a button. A button is formed by wrapping a small rock in the tarp and securing your cordage around that using a clove hitch or jam knot.
If your tarp has a hole, you can repair it using duct tape or by sewing it shut.
Other methods
If you do not have a sewing kit, you can use duct tape, safety pins, super glue, or cordage as temporary fixes.
Knots
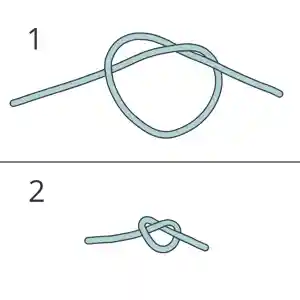
Overhand knot
Used to prevent the end of a rope from untwisting. This is hard to undo but very easy to tie.
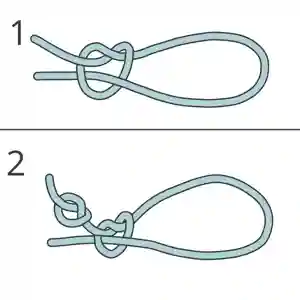
Overhand loop
Used to create a loop at the end of a line. In most cases a bowline would be a better choice, but this knot is easy to tie.
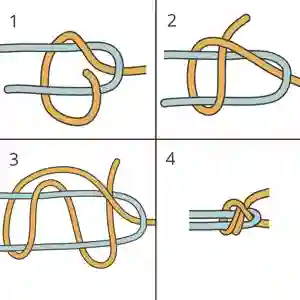
Double sheet bend
Used for tying two lines together.
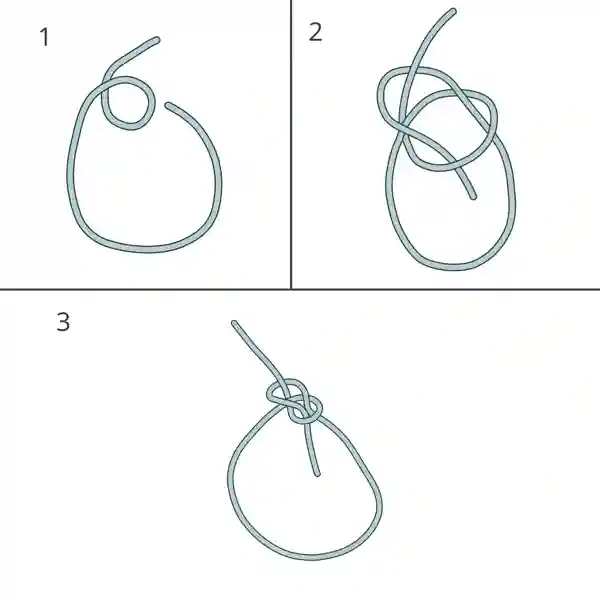
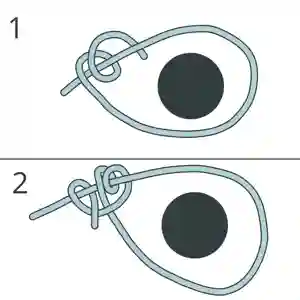
Bowline
Used to create a loop at the end of a line. You can pass a line around a tree and through the bowline loop to secure the end of a line to the tree.
You can use a bowline to attach a line to a grommet on a tarp.
Jam knot
Used to fasten a rope to a timber or pole. This can be used in place of lashings. It can be loosened by pulling on the knot on the end. It is hard to untie this knot.
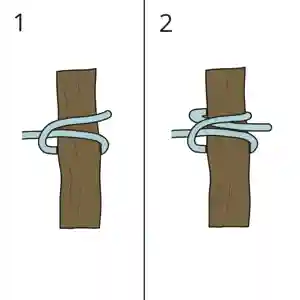
Clove hitch
Used to fasten a rope to a timber or pole. It can be tied at any point in a rope.
Taut-line hitch
Used to tighten a line.
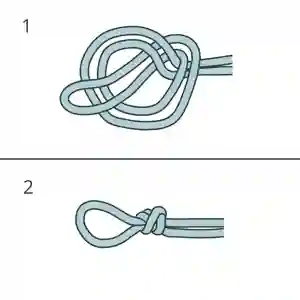
Trucker's hitch
Used to secure a load or tighten a line. Can be cinched down tighter than a taut-line hitch.

Square lashing
Used to secure one pole at a right angle to another pole. You can swap with the diagonal lashing if desired.

Shear lashing
Used for lashing two or more poles next to each other. It can be used to construct a tripod.

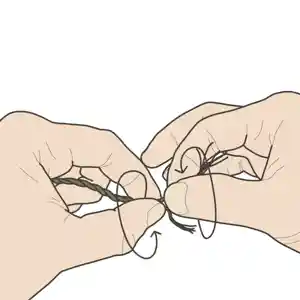
Craft: Cordage
Cordage can be made by twisting fibers together. It is weaker than rope but can be used for sewing, fishing line, or light-duty cordage.
Resources
Any fibrous material can be used to make cordage. Some examples include:
- Grasses and sedges (sedges are stronger)
- Bark or palm fiber
Instructions
- Gather the fibers into a loose bundle.
- Hold the bundle near the center and twist one side clockwise until a kink forms.
- Fold the bundle in half at the kink.
- Twist the top half clockwise.
- Twist the two halves together counterclockwise.
- Repeat the process until you have a full strand. If material is running out, add more material and twist it in.
Craft: Tent stakes
Resources
- A short stick
- A knife
- Something to use as a hammer, such as a rock or thick stick
Instructions
- Sharpen one end of a stake to a point.
- Hammer the stake into the ground at a slight angle, leaning away from your shelter.
- Secure a line to your tent or tarp with a bowline.
- Secure the other end of the line to the stake with a jam knot, clove hitch, or taut-line hitch.