7 - Navigation
Being able to navigate in the wilderness can help prevent you from getting lost in the first place or allow you to find your way back to safety if you go off-trail.
This chapter is for informational purposes only and does not replace professional advice; use at your own risk and ensure compliance with local laws.
Be prepared
Gear
Necessities:
- Map
- Compass
- Flashlight/headlamp
Optional:
- GPS device
Knowledge and skills
Start by learning how to do the following:
- Navigate with a map and compass.
- Plan a route.
- Set declination on a compass.
- Determine your location on a map.
- Measure distances on a map.
- Read a topographic map.
Once you have mastered these skills, you should learn how to do the following:
- Use a GPS device for navigation.
- Utilize advanced navigation techniques, like using the sun and stars.
- Take a detour.
Route planning
When planning a route, choose one that matches your skill and fitness levels, using a topographic map to gauge terrain difficulty. Use the map to identify landmarks, like stream or river crossings, natural formations, or trail intersections, along the way to help you stay on track. Also, be sure to identify water sources, alternative routes, and the direction to roads or towns.
Movement
Moving carefully and adapting to the terrain are important preventions you can take against injury or getting lost. In general, keep your body weight balanced over your feet, watch where you step, and take frequent breaks to rest. Stay on the designated trails at all times and be cautious of animal trails; they may lead to resources like water but can also get you lost.
Trekking poles or a walking stick can be beneficial for some people, especially in rough terrain or if you have knee problems. You can check if you are using the correct-height pole by making sure you have a 90-degree bend at your elbow when the pole is touching the ground.
Mountains
The steep slopes of mountainous terrain can tire you out or injure your joints, so be extra vigilant about taking breaks. To make it easier to follow uphill trails, walk in a zigzag path; this pattern will increase the distance you travel, but it will be less steep. When descending, maintain a bend in your knees to protect your joints. If you are climbing a tall mountain, take your time so that you can acclimate to higher altitudes without getting sick.
Snow
It can be taxing to travel in snowy conditions, and you don't know for sure what you are stepping on; the snow may be hiding a patch of ice, a hole, or water. You can use a pole or stick to test ice and snow before stepping. Avoid walking on frozen bodies of water unless you know the ice thickness. If you have snowshoes or skis, use them to help prevent your feet from sinking into the snow.
Watch out for areas prone to avalanches. They are usually marked and typically occur on slopes between 30° and 45°.
Desert
Deserts are typically hot and dry, with potentially cold nights, so be prepared by bringing appropriate clothing and extra water. Avoid traveling during the hottest part of the day and stick to areas of shade if possible. Due to the lack of visual features, paths in a desert may appear shorter than they actually are. If you are carrying electronic devices, be sure to protect them from extreme heat and direct sunlight.
Jungle
Jungles feature dense vegetation, high humidity, and frequent precipitation. Move with the vegetation rather than against it to conserve energy, and focus on distant landmarks rather than nearby objects to maintain your direction. The dense canopy makes it harder for search parties to find you, and GPS devices may not be reliable. Always wear protective clothing to avoid insect bites and stings, and treat any wounds or scratches promptly to prevent infection.
Night
If you can avoid traveling at night, then it is best to remain where you are. If you have to travel, use a flashlight or headlamp to illuminate your path while moving slowly and carefully to avoid accidents. Use your hearing to identify helpful environmental cues like running water or distant roadways that can aid in orientation.
Rivers and streams
When crossing rivers or streams, search for the narrowest section or areas where the water splits into multiple channels. Whenever possible, use bridges, fallen trees, or rocks as crossing points, but be cautious of slippery or loose surfaces. Avoid crossing where currents are strong or near ledges. Anytime you cross a river or stream, unbuckle your backpack and carry it in front of you to prevent being pulled underwater by its weight if you fall.
In emergency situations, following a river downstream may eventually lead to civilization, as many settlements are built near water sources.
Coastal
Coastal regions typically feature tides, cliffs, and rocky or sandy beaches. Do not walk on beaches without footwear, as there may be buried glass or other sharp objects. To avoid getting trapped during high tide, be sure to consult tide tables before your trip and keep track of the time. See the Weather chapter for help predicting tides.
Detours
If there's an obstacle in your path, you may need to take a detour. To do this, find a feature to navigate to on the other side of the obstacle, then turn 90 degrees and walk to the end of the obstacle. Once there, turn back 90 degrees to your original heading and pass the obstacle. Then, turn 90 degrees again and walk to the feature you picked out. Finally, turn 90 degrees one more time to resume following your original bearing.
Trail markers
Trail markers indicate where the trail is and distinguish one trail from another. Many methods are used to mark trails, and there is no universal standard.
Blazes
Blazes are painted symbols on trees or rocks. Typically, they are rectangles, squares, circles, triangles, or crosses. In most places, each trail is painted with a different color and/or shape of blaze.
Some blazes may also indicate the trail's direction, but this may not apply everywhere.
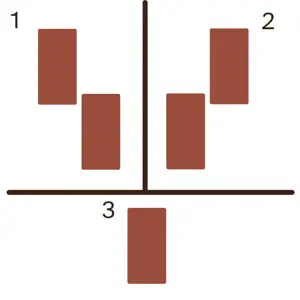
- Two blazes, top blaze to the left: Continue to the left
- Two blazes, top blaze to the right: Continue to the right
- One blaze: Continue straight
While not always true, the color and/or shape of the blazes should match what appears on a map, except that white blazes are typically black on a map. If a trail is new, it may have small plastic strips or flags tied to a tree instead of a blaze.
Cairns
Cairns are piles of rocks, typically used in places without large trees to blaze. Cairns are usually placed on the side of the trail, and you should be able to see multiple cairns at a time. In some places, cairns may be small stacks of stones (typically 3) and can be hard to locate.
Signs
Trail signs provide information about which trail you are on, distance/direction to points of interest, or offer general information/alerts. Always read and abide by trail signs.
Blockers
In some places, downed trees or debris are intentionally placed in front of a path to indicate it should not be used.
GPS
A GPS device can help you determine your location and navigate to a specific point, but always have a backup plan in case the device fails. A dedicated hiking GPS unit is typically more durable than a smartphone, but a smartphone with a GPS or maps app is sufficient.
Location
A GPS uses satellites to determine your location. Ensure the device has a clear view of the sky so it can receive signals. Most GPS units display your coordinates in latitude and longitude, which can be plotted on a map.
Waypoints
A waypoint is a specific location you want to navigate to. You can enter waypoints into your GPS to guide you to your destination. Most devices allow you to enter waypoints before your trip, but you can also add them as you go. Place waypoints frequently so you can backtrack if necessary.
Battery
Your GPS device may run out of battery, so carry extra batteries or a portable charger to keep it powered.
Digital maps
If your GPS supports digital maps, download maps of your area in advance to navigate even if you lose the signal.
Compass
A compass helps you determine direction and is essential for navigation, especially with a map. Do not use the compass around metal objects, as it will cause the reading to be inaccurate. If you are using a digital compass on a smartphone, it will need to be calibrated by rotating your device in a figure-8 pattern (the pattern may vary by device).
Directions
You may see directions indicated in symbols, words, or degrees (0° to 360°). Here are some common directions you may encounter:
- North (N): 0° or 360°
- Northeast (NE): 45°
- East (E): 90°
- Southeast (SE): 135°
- South (S): 180°
- Southwest (SW): 225°
- West (W): 270°
- Northwest (NW): 315°
Bearings
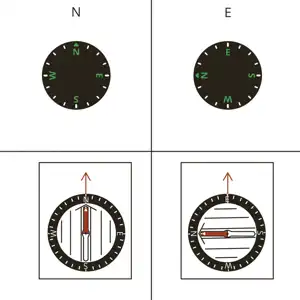
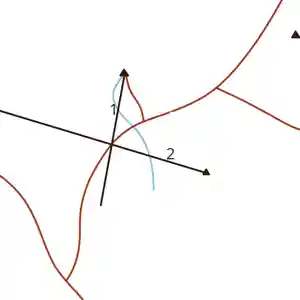
A bearing is the direction you must travel to reach a specific point. Determining your bearing will depend on the type of compass you are using. On most compasses, either the whole dial or a needle will rotate to face north.
Dial compasses (button, dial, lensatic, digital) have a circular plate that features printed direction indicators and tick marks. Hold the compass flat and in front of you. The direction on the plate that is facing forward is your bearing.
Needle or baseplate compasses have a rotating needle, with one side normally painted red to indicate north. The directions are printed onto a bezel that you can rotate by hand, and you may see a wide arrow under the needle that rotates with this. There is usually an arrow or line on the housing that doesn't move. Hold the compass flat and in front of you with the fixed arrow pointed away from you. Rotate the bezel until the north side of the needle aligns with the wide arrow below it or north on the dial (they are the same). The direction right behind the arrow is your bearing.
You can use the image below to see how to read the direction on your compass.
If you know which direction you need to go, rotate yourself until you are facing that bearing. You can avoid having to keep your compass out by identifying a prominent feature in the distance and walking to that.
Back bearings
A back bearing is the opposite direction of your current bearing. To calculate a back bearing: if your bearing is less than 180 degrees, add 180. If it's more than 180, subtract 180. On a compass, the back bearing is directly across from the bearing.
To use a back bearing to navigate, you need to take a bearing before hiking out. Keep this bearing written down or memorized, and as long as you didn't drastically change direction, following the back bearing will lead you close to your starting location. Every time you make a turn, you should record a bearing.
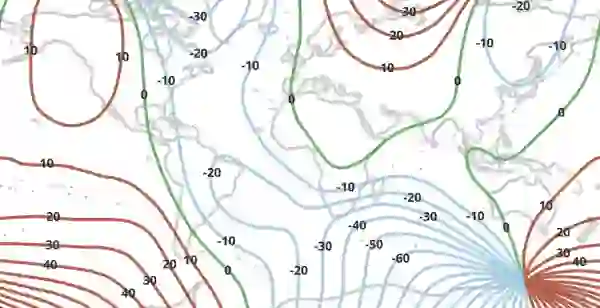
Declination
Declination is the difference between magnetic north (usually shown as MN) and true north (usually shown as TN or a star symbol) and is usually shown on the map as two arrows and a degree. Your map is likely aligned with true north. If your compass has a declination adjustment, rotate it to match the arrow and you are all set to compare bearings between the compass and the map with no additional adjustments. Otherwise, you will need to adjust for declination manually using the following techniques: To convert from a reading on your compass to a reading on the map, add the declination to your compass reading. To convert from the map to the compass, subtract the declination. If the magnetic north arrow is drawn to the left of the true north arrow, the declination amount is negative. For example, if your map lists 10° of declination:
- A compass bearing of 20° would be 30° on the map (20° + 10°).
- A map reading of 30° would be 20° on the compass (30° - 10°).
On rare occasions, a map may be oriented to grid north (GN) rather than true north. These maps list a second degree amount, which is the difference between true north and grid north. Add this amount to the declination to orient your compass to the lines on the map.
Declination changes over time, so if you are using an old map, you should look up the current declination amount for your location.
Here's a declination map for 2025:
Map
A map is a key tool for navigation, especially when paired with a compass.
Orientation
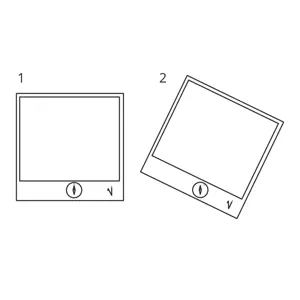
You can orient a map to point north using a compass:
- Place the compass on the map with the direction of travel arrow pointing toward the top of the map.
- Rotate the map and compass together until the compass points north. The image below shows what the map will look like if your compass is adjusted for declination (1) or if you need to align with magnetic north instead (2).
Determining location
To determine your location on a map, identify prominent features around you and match them to the map. Use a compass to determine your direction and align the map accordingly.
To triangulate your location:
- Orient the map to point north using your compass.
- Identify and mark two prominent features around you on the map.
- Measure the bearing to each feature using your compass.
- Draw lines from each feature in the direction of the bearing on the map.
- The point where the lines intersect is your location.
To get your GPS coordinates on a map in UTM (a very common coordinate system):
- Find the UTM zone number, which is a one- or two-digit number followed by a letter (for example, "16T").
- Locate the Easting and Northing values on the map's borders. They are usually marked and can have 3 to 6 or 7 digits. Add three zeros if there are only 3 digits (e.g., 123 becomes 123000). Easting will be on the top or bottom; Northing will be on the left or right.
- Look at the grid lines on the map to identify the grid zone where your location is. These lines represent the first digits of your location (e.g., 123000E and 234000N).
- For increased precision, divide the grid into 10 equal sections vertically and horizontally. Determine which line your location is closest to within the grid. Use a ruler for accuracy. For example, if your location is two-tenths to the right and one-tenth up from the bottom-left corner of the grid, your new location will be 123200E and 234100N.
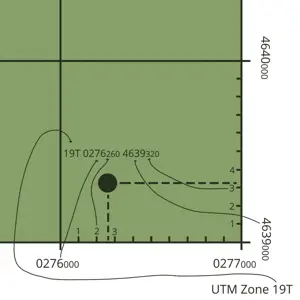
You can follow those steps in reverse to transfer a GPS coordinate onto your map. Just be sure to set your GPS coordinates to match the map's coordinate format.
If your map does not have UTM grid lines, you can still follow the same approach using the coordinate values on the sides of the map. Some systems may use decimal places instead.
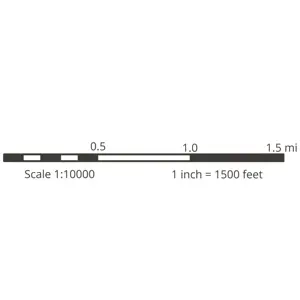
Scale
Maps are drawn to scale, allowing you to determine distances between points. Usually, there is a bar on the map that indicates the scale, and you can use a ruler, string, or your finger to measure distances using it on your map. Maps may list the scale as text, such as 1 inch = 1 mile, which means that every inch you measure on your map with a ruler is 1 mile on the actual terrain. You may also see a ratio listed, such as 1:10000, which means every inch on the map is 10,000 inches in the real world.
Topographic maps
Topographic maps show elevation changes and terrain features, making them helpful in navigating mountainous or hilly areas. Contour lines indicate elevation; the closer the lines are, the steeper the terrain. Elevation markers on contour lines help identify peaks and valleys.
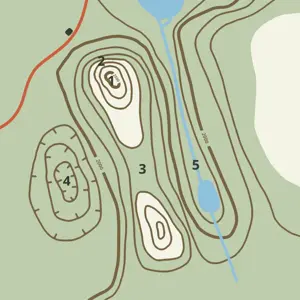
- Peak
- Cliff
- Ridge
- Depression
- Valley
Typical map colors include:
- Black: Structures
- Red: Roads
- Green: Vegetation
- White: Lack of vegetation
- Brown: Contour lines
- Blue: Water
Estimating distance
When navigating, it's often important to keep track of how far you've traveled. If your GPS or phone supports distance tracking, that will be the easiest approach. If you don't have that, you can either measure distances on a map or estimate the distance using your paces or average speed.
When estimating distances, you may want to deal with a range of possible estimates rather than calculating a single value. For example, calculate your distance with a speed of 1.5 mph and 3 mph to get a lower and upper bound on the distance you traveled. You can do the same with the pace method by choosing a lower and a higher pace length than your average.
Paces
A pace is the distance you cover with every full step with the same foot, which can be used to estimate how far you've traveled. The length of a pace (called stride length) varies by person, terrain, and the weight of your gear, so it is important that you get a good estimate of your stride length across a variety of conditions. To estimate your stride length, do the following:
- Measure a fixed distance with your desired terrain; 100 yards/meters is typically a good length.
- Put on your loaded backpack if needed.
- Walk this distance and count how many paces it takes you.
- Divide the distance by the number of paces (for example, 100 yards/130 paces = 0.77).
- Repeat steps 3 and 4 several times and calculate the average pace for a better estimate.
Once you know what your pace length is, you can estimate distance traveled by keeping count of your paces and multiplying it by the pace length (for example, 130 paces × 0.77 yards per pace = 100 yards).
If you have a smartphone with a pedometer or step counter app, you can use that to estimate distance. Typically, these apps will convert your steps to a distance.
To help you estimate, here's the distance traveled using the average stride length of 0.78 yards (0.71 m):
- 200 paces ≈ 156 yards (143 m, 0.09 mi, 0.14 km)
- 500 paces ≈ 390 yards (357 m, 0.22 mi, 0.36 km)
- 1000 paces ≈ 780 yards (713 m, 0.44 mi, 0.71 km)
You can keep track of the count by putting a small pebble in your pocket every 100 yards/meters. When you have 10 pebbles in your pocket, remove them all and place one pebble into your other pocket. The pebbles in your second pocket will represent 1,000 yards/meters and will reduce the number of pebbles you need to carry.
Your stride length will likely be shorter on difficult terrain or in bad weather.
Average speed
A simpler method of estimating how far you've traveled is to use the average hiking speed multiplied by the time spent hiking. You can calculate your hiking speed by timing how long it takes you to hike a trail of known distance and then dividing the distance by time. The average person hikes at around 2 mph (3.2 km/h) on flat terrain, but this can vary based on fitness level, terrain, and load.
To calculate the distance traveled using this method, multiply your average speed by the time spent hiking in hours. For example, if you hiked for 15 minutes and have an average speed of 2 mph, then you would do 0.25 hours × 2 mph to get 0.5 miles.
To help you estimate, here's the distance traveled using an average speed of 2 mph (3.2 km/h):
- 15 minutes ≈ 0.5 miles (0.8 km)
- 30 minutes ≈ 1 mile (1.6 km)
- 1 hour ≈ 2 miles (3.2 km)
Advanced direction finding
You can use the sun or stars to determine direction without a compass. If you need this, it's best to stay where you are and signal for help with the methods mentioned in the Overview chapter.
Sun/Moon
In the early morning, the sun will be close to the east, and in the late afternoon, it will be close to the west. The same applies to the moon at moonrise and moonset. During the day, the sun will be in the southern half of the sky in the Northern Hemisphere and in the northern half in the Southern Hemisphere.
Shadows
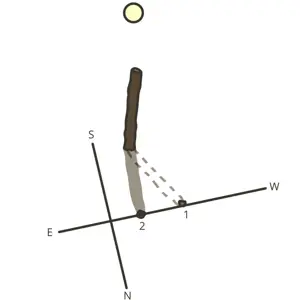
If you measure which way shadows are moving over time, you can determine direction. This is because the Sun moves east to west throughout the sky, and therefore shadows move in the opposite direction.
- Place a stick vertically in the ground and mark the shadow tip.
- After 15-30 minutes, mark the new position of the shadow tip.
- Draw a line between the two points for an east-west line. West will be in the direction of the first point.
- Draw a line at a right angle to the east-west line. South (or north in the Southern Hemisphere) will point toward the sun.
Time
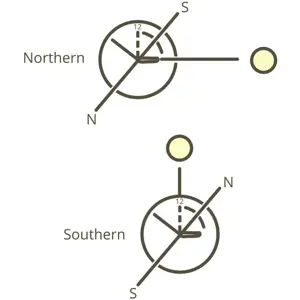
You can determine your direction using the position of the sun and the current time. This will be a rough approximation, but it's better than nothing. Point the hour hand of an analog watch at the sun; south is roughly halfway between the hour hand and 12 o'clock in the Northern Hemisphere. In the Southern Hemisphere, point the 12 o'clock position at the sun, and north will be roughly halfway between the 12 o'clock position and the hour hand. If on daylight saving time, use 1 o'clock instead of 12; daylight saving time is usually during the summer for the regions that follow it, but this may vary.
Stars
Being able to identify a handful of constellations will help you determine direction at night. The constellations may appear to be rotated in the sky depending on the time of night (they rotate around the celestial poles), so if you don't immediately spot them, try looking for a rotated version of the constellation.
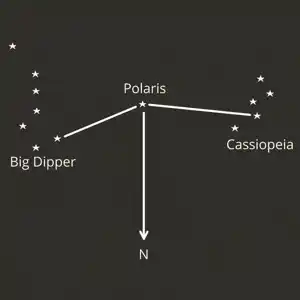
In the Northern Hemisphere, identify Polaris (the North Star) using the Big Dipper and Cassiopeia as reference points. Polaris is directly to the north.
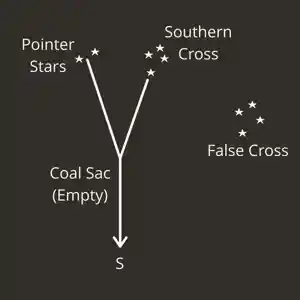
In the Southern Hemisphere, you can use the Southern Cross to determine south. Extend a line from the top and bottom stars of the Cross's long axis, continuing about 4.5 times the distance between these stars toward the horizon to approximate the South Pole. This method is more difficult than the one used in the Northern Hemisphere.
Craft: Compass
You can craft a makeshift compass by magnetizing a needle and floating it in water.
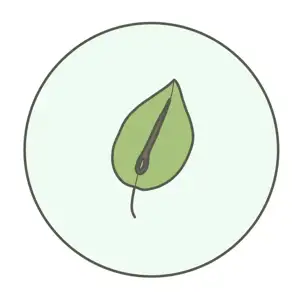
Resources
- Needle
- Knife
- Leaf or bottle cap
- Water
Instructions
- Magnetize the needle by stroking it with the knife in one direction (to avoid dulling the blade, use the back of the knife). Stroke at least 50 times.
- Place the needle on the leaf/cap and float it in water. The needle will slowly align to the north-south axis. Ensure no currents or wind could affect the needle.